Table of Contents:
- Closing News: What impacts you on June 30
- Supplier News: Phishing with our suppliers
- Travel and Expense News: Location form request
- Training News: Online session available
- Supplier News: New direct deposit form
- Tech Tip: Creating your own contact group
Closing News: What impacts you on June 30
It’s the time of year when fiscally-minded folks get excited about their busy season while others are busy planning vacations. Here are some tools that can help you plan early to wrap up year-end transactions.
- Fiscal Year End Closing Schedule: It provides important information about timing of payable transactions to ensure they are reported in the correct fiscal year.
- Encumbrances: Check out the PO and Payroll Encumbrance Reports to help you see what expenses have been recorded as still owed in FY19 by DeptID. Payroll allows you to search by EmplID or by DeptID for all PS Accounts (if you leave unspecified). PO allows you to see the open POs that may need to be paid or closed before 6/30, as well as vouchers applied to the PO.
- Cognos Reporting > Team Content > Budget & Planning Reports > SALPLN Reports > Payroll and PO Encumbrances Reports
- T&E Profiles: Check your T&E Profile to ensure a valid chartfield is listed. This will help with expense report accruals and future cash advance disbursements.
- Expense transactions in GL: The key to getting the expense posted in the correct period is to use the correct expense dates AND have the transaction approved by all levels by close of business 7/10. Check the Closing Schedule to see what is accrued by System and let APSS know if something got missed.
- What’s pending approval? Learn more about the Unpaid ERs and Unapproved Voucher Reports in WebApps in the 2016 4th Quarter newsletter to get transactions pushed through workflow.
Supplier News: Supplier changes
Our suppliers grow and change just as we do. They like to go by other names, move locations, change their bank, and they join with others. No problem, we can make those changes in our supplier database.
However, in the age of digital information we need to validate the accuracy of the changes. We need to take the time to contact our supplier directly using another communication method to validate the change requested. If you receive an email, give them a call based on your known contact information or look up the phone number for the business online. If you receive a call, send an email to your known contact to confirm the change. If they need to change bank account information or set up ACH, make sure they complete the NEW Direct Deposit Form (PDF)*.
Another common phishing attempt is a “supplier” requesting the status of a payment and indicating their bank account information may have not been updated. Do not provide information unless you can receive validation that you are talking to the supplier. Be alert for a phone number displaying from a zip code other than where the business is located. The “supplier” not being able to provide an invoice number, which comes from their accounting system, or a valid University PO number. These individuals just need a little information (confirmation that the supplier does business with us) and then they will attempt to send an email with new bank information and fictitious invoice for payment.
 We can no longer simply accept a change via email or phone call. Hackers have learned how to ask just enough information and even access email accounts and look at recent activity to see where payments are still expected. They have learned how to mimic phone numbers making it appear as though the supplier is making the call. While that extra five minutes to validate might seem unnecessary, it could save the University and our suppliers from a potential theft.
So what are your next steps if a fictitious request is made? Chances are you were made aware that it was fictitious during your validation with the supplier. The supplier should be investigating how this happened and reporting to their insurance company (if payment was stolen) and local police. The University department should be notifying Campus Police and complete the Disappearance of Assets (UM155) form (if payment was sent). The form should be passed to Campus Division of Finance, UM Risk & Insurance Management, and UM Internal Audit promptly.
APSS should also be made aware as to investigate recent changes for that supplier and place an alert on the supplier record to be cautious with future change requests. They can also contact the supplier to confirm recent payments processed by the University to ensure they were received.
Don’t just take the change at face value; take the time to validate!
*The Direct Deposit Form is accessible only to University employees, provided to the supplier contact, returned to the department, validated using another form of communication with the supplier, and attached to the supplier request in PeopleSoft.
Travel and Expense News: Location form request
A new form is available that allows you to directly request a Travel and Expense location that reduces turnaround time by core offices.
Travel and Expense tile > myForms > T&E Location Form
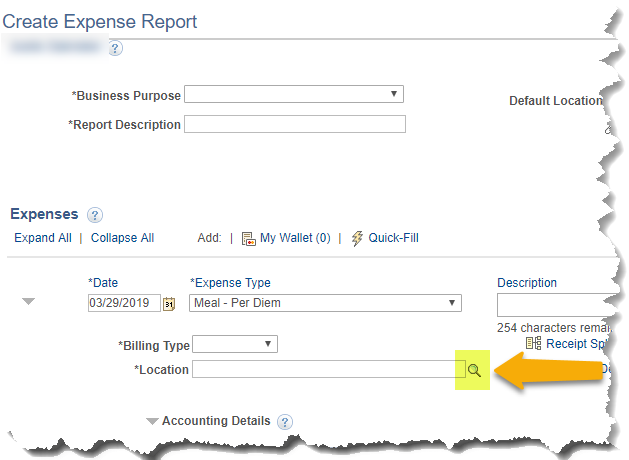
While we have almost 4,000 locations already in our system, we wanted to make it easier for users to get a new one added if necessary. Keep in mind you don’t always need a location to submit an expense report, and it is typically only required on a few expense types such as Meal - Per Diem and Transportation – Airline. If you are submitting an expense line that does require a location, you can confirm whether it already exists by clicking the spyglass tool (see below). If you cannot find the location you need, instructions on how to navigate to the new form can be found HERE.

If you have any questions, please contact the Finance Support Center.
Training News: Online session available
TEmployee just learning accounts payable transactions or you need a refresher…no problem, we have training available on demand!
How to Pay for Goods and Services
Online anytime & just 30 min to complete
Click HERE to launch
Supplier News: New direct deposit form
There is a NEW Direct Deposit Enrollment Form for new or changes to supplier’s ACH bank information. Provide a copy of the form to the supplier for completion and it must be attached to the Supplier Request. It is now only accessible by University employees and accepted only through a Supplier Request, to help minimize phishing attempts.
Access the Direct Deposit Form
Tech Tip: Creating your own contact group
So you are getting ready to email the committee you are on the documents to review before the meeting. You have to stop and think about all 6 people on the committee to make sure you selected them as in the “To” field of the email. This takes time selecting, even if these individuals pop up in your frequents as you start typing their name. And what if you forget to include someone? How embarrassing that you forgot that individual and ultimately they were left out of the loop on an important topic.
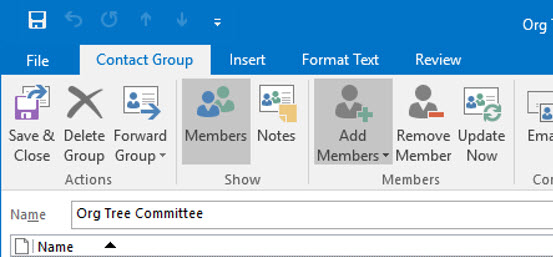
Alternatively, you can create your own Outlook Contact Group that is available to just you. Here are the steps:

- Address Book
- File
- New Entry
- New Contact Group
- Put in “Contacts – [your email]”
- OK
- Create your group
- Name it
- Add members
- Save and close
To use the group, you may need to select it from the address book at first.Make sure to change the address book from Global Address List to Contacts. After you have used it a few times, you can type the name in the “To” field and it will find the contact.

The key to a successful group is keeping it up to date with the appropriate contacts!
Reviewed 2021-09-22
